

Kiwi Bach New Year 2015


Rack of Lamb Xmas Dinner

http://www.williams-sonoma.com/recipe/rack-lamb-herb-mustard-crust.html
Ingredients:
2 racks of lamb, each with 8 ribs, Frenched (about
2 1/2 lb. total)
Kosher salt and freshly ground pepper, to taste
1 1/2 cups fresh bread crumbs
1/4 cup chopped fresh flat-leaf parsley
2 Tbs. chopped fresh mint
1 Tbs. chopped fresh rosemary
2 Tbs. Dijon mustard
2 Tbs. olive oil
Directions:
Season the racks of lamb with salt and pepper. Let stand at room temperature for 1 hour. In a bowl, stir together the bread crumbs, parsley, mint, rosemary, salt and pepper.
Preheat an oven to 375°F.
Brush the meaty side of each lamb rack with 1 Tbs. mustard. Pack the bread crumb mixture onto the meaty side.
In a large fry pan over medium-high heat, warm the olive oil until just smoking. Add the lamb racks, bread-crumb side down, and brown on both sides, about 2 minutes per side. Place the racks, bread-crumb side up, on a rack in a roasting pan. Transfer to the oven and roast until the crust is nicely browned and an instant-read thermometer inserted into the thickest part of the meat, away from the bone, registers 130°F for medium-rare, 20 to 25 minutes, or until done to your liking.
Transfer the lamb to a carving board, cover loosely with aluminum foil and let rest for 15 minutes. Carve the racks into double chops and serve immediately. Serves 8.
Williams-Sonoma Kitchen
Melting Moments …the real deal
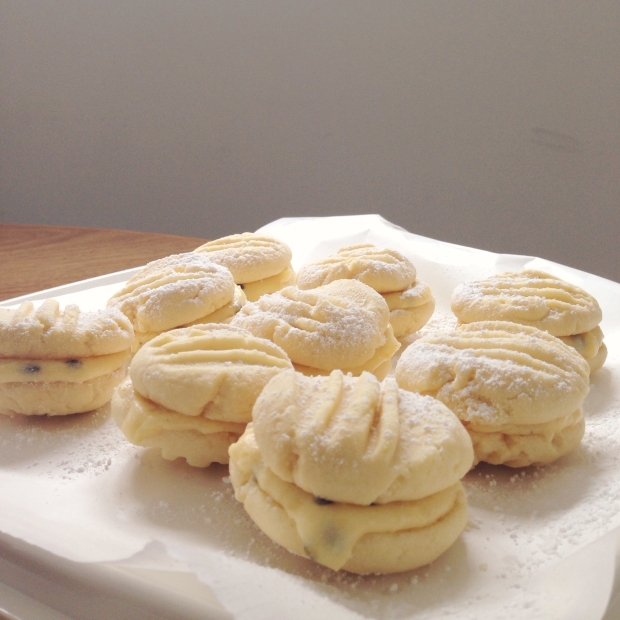
Saturday morning I woke early to a miserable Wellington day, howling winds and rain and decided to bake. I have been dying to make melting moments with passion fruit icing for quite sometime and thought I would surprise my daughter and hubby with them when they got up.
I adapted Chelsea Winter’s recipe but only slightly because I had no vanilla paste or extract only the budget vanilla essence.
I followed the recipe below and they came out lovely.
Ingredients
260g butter, at room temperature
1/2 cup icing sugar
1 tsp vanilla paste or extract
1 1/2 cups plain flour
1 tsp baking powder
2/3 cup cornflour
Zest of 1 lemon
Icing sugar, for dusting
Extra cornflour, for dusting the fork
Icing
2 cups icing sugar
25g butter
Pulp and seeds from 5-6 passionfruit
Method
Preheat the oven to 160c (140c fan bake if that’s all you have), and line a large baking tray with baking paper.
Beat/cream the butter and icing sugar until well combined. Beat in the vanilla.
Sift the flour, baking powder and cornflour into another bowl and whisk to mix well, then add to the creamed mixture with the lemon zest and mix to form a crumbly dough.
Roll into walnut-sized balls and place 5cm apart on the prepared tray. Press each one down lightly with a fork dipped in the extra cornflour.
Bake in the oven for 10-12 minutes – they shouldn’t colour really, only very slightly if at all. Let cool completely on the tray.
Filling
Beat the icing sugar and butter together, beat in the passionfruit. If it’s too runny, add more icing sugar. If it’s too thick, add more passionfruit pulp. Spoon the icing on a biscuit half and press another half on top. Dust with icing sugar and keep in an airtight container in a cool place (even the fridge)
Gluten free ginger and nut slice “Chelsea Winter”
My daughter has made a very wise decision to move home for a few weeks before she heads off on her OE. She has been slowly educating me about gluten and dairy free diet for her own personal health.So today we decided to bake something together for the first time (much to my hubby’s amusement) because mother like daughter we get a little bit stroppy so to speak. Hubby is really keen to enter us in the next Master Chef as a team because he reckons when the sparks fly it would improve the ratings!
Anyway we decided to give this lovely recipe from Chelsea Winter a go. We went to Moore Wilson’s to find the coconut flour and a few other ingredients and more importantly a freshly brewed Supreme bean cappuccino first. We ended up getting a general baking gluten free flour by Healtheries instead of buying coconut flour as seen in the recipe, at $16/kg a pop it seemed a little bit too expensive just for one recipe.
Anyway we followed the recipe exactly, except for the icing because I insist on a thick layer of icing to make it worthwhile none of this “moderation” malarkey comes out of this kitchen.
We tried out just a little corner of the slice to see what it like and it was still slightly warm and very moreish. Then got covered and whisked away to a pot luck dinner with my daughter and her friend somewhere in Wellington.
So I think all the squabbles in the kitchen may have paid off, plus some free entertainment for Mr S.
Enjoy xoxo

My beautiful daughter’s journey towards wellness
Gabrielle is my beautiful daughter who has been through so much and is taking back her life. You can follow her journey through her blog. http://www.kaleandkinder.com/search/label/Recipes


My little project (Reposted)Update 6 months later
Anyone who might remember me posting this well 6 months later I finally get around to taking a photograph of my baby AVO tree. She is beautiful and so worth the wait. So next time you guys cut an avocado open to spread on your vogel toast in the morning. Don’t throw away the pit and try growing your own little tree. xo

Growing my own avocado tree is an exciting prospect and I found these instructions and photograph from apartment therapy.com. So going to give this a go. Will post my progress and keep you updated. Here is another useful website for the novice avocado grower like me. http://inhabitat.com/how-to-grow-an-avocado-tree-from-an-avocado-pit/
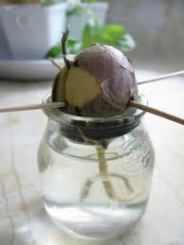
1. Wash the seed. Using three toothpicks, suspend it broad end down over a water-filled glass to cover about an inch of the seed.
2. Put it in a warm place out of direct sunlight and replenish water as needed. You should see roots and stem sprout in about two to six weeks.
3. When the stem is six to seven inches long, cut it back to about three inches.
4. When the roots are thick and the stem has leafed out again, plant it in a rich humus soil in a 10-1/2″ diameter pot, leaving the seed half exposed.
5. Give it frequent, light waterings with an occasional deep soak. Generally, the soil should be moist but not saturated. Yellowing leaves are a sign of over-watering; let the plant dry out for a few days.
6. The more sunlight, the better.
7. If leaves turn brown and fry at the tips, too much salt has accumulated in the soil. Let water run freely into the pot and drain for several minutes.
8. When the stem is 12 inches high, cut it back to 6 inches to encourage the growth of new shoots.
9. Don’t expect your house plant to bear fruit. Although this does occur occasionally, it usually requires grafting. A plant grown from seed will take anywhere from five to 13 years to flower and bear fruit. Fruit on trees grown from seeds are seldom good to eat.

Banana Cake for Work Farewell morning tea

Every now and then we need to bake for the office this recipe is big enough to feed an army and is a real hit at work and home.
Ingredients
250g melted butter
2 1/2 cups of Chelsea Caster Sugar
2 large eggs
2 Tbsp Chelsea Golden Syrup
Banana cake option: 2 large ripe bananas, mashed
4 cups self raising flour
Chocolate Cake option: 3 Tbsp cocoa
2 tsp baking soda
2 1/2 cups luke warm milk
Method
Line with baking paper a very large tin (equivalent to an oven roasting dish). Pre-heat oven to 180°C.
Beat butter and caster sugar. Mix in eggs and golden syrup.
If making a banana cake, add bananas and mix well.
Sift together flour and cocoa (add cocoa if baking a chocolate cake).
Dissolve baking soda in milk. Add dry ingredients and milk into the butter mixture and mix together until well combined and lump free.
Pour into prepared cake tin and bake for 45-50 minutes or until cake comes away from the sides of the paper.
Wait 10 minutes before turning cake onto rack to cool.
When cold, ice with chocolate icing sprinkle with coconut or chocolate sprinkles and serve.

Enjoy peace and love foodies
Toddler

Love thy neighbors with Banana Cake
Dead bananas accumulating in the fruit bowl quicker than I can bake with them makes me sad 😦
However when I did finally get around to baking tonight I managed to find a recipe that makes two banana cakes from one recipe. So will be delivering the young couple and their beautiful new baby with a banana cake tomorrow morning. The gift of sharing makes me happy.
Hope you enjoy the recipe.
Beautiful People Great Food

Phen’s Restaurant Management and Waiting Staff Nai Yang Beach Phuket
